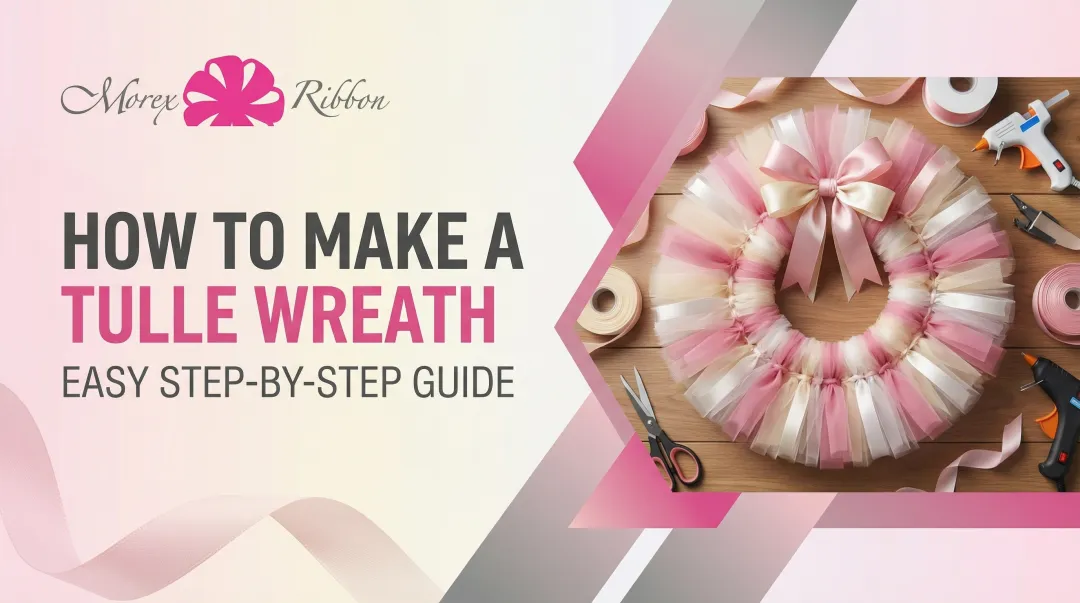
Introduction
A beautifully crafted wired ribbon bow transforms ordinary gifts, wreaths, and holiday décor into something genuinely special. The structured loops hold their shape and volume in a way flat ribbon simply can't replicate.
Most people assume bow making requires advanced crafting skills, but wired ribbon makes the process surprisingly approachable. The thin wire running along both edges holds each loop exactly where you place it — so you can adjust, reshape, and perfect the bow without anything drooping or going flat.
This guide covers the right materials, a clear step-by-step method, the variables that separate flat bows from full dimensional ones, and the most common beginner mistakes. Follow along and you'll have a polished, professional bow ready to go — whether it's for a gift, a wreath, or a centerpiece.
Key Takeaways
- Wired ribbon holds each loop's shape independently, making it the easiest ribbon type for bow making
- Build alternating loops on each side of a center loop, then secure with floral wire or a pipe cleaner
- More loops and wider ribbon produce fuller bows; adjust both to fit your project size
- Fluffing after securing transforms a flat bundle into a dimensional, professional bow
- Plan for 6–9 feet of ribbon per standard bow with tails
What You Need to Make a Wired Ribbon Bow
You'll need two things: the right ribbon and a handful of basic fastening tools. Here's what to gather before you start.
Ribbon Selection
Wired ribbon is the top choice for bow making because the thin wire woven into both edges holds each loop's shape independently. You can position and reposition loops without them drooping, making it ideal for beginners and experienced crafters alike.
Ribbon width:
- 1.5-inch ribbon works well for gift bows and hair accessories
- 2.5-inch ribbon is the standard for wreath and tree bows
- 4-inch ribbon creates dramatic statement pieces for large outdoor wreaths
Morex Ribbon offers wired ribbon in a wide range of widths and colors—including holiday, seasonal, and specialty patterns—all tested to Oeko-Tex Standard 100. This certification ensures the ribbons are free from harmful chemicals, making them a reliable choice when color vibrancy and consistency matter for your projects.
Ribbon quantity: Plan for 6–9 feet per bow depending on desired size and number of loops. Larger decorative bows for wreaths may require 10 feet or more. Start with extra ribbon and trim the tails—running short mid-construction is harder to recover from.
Tools and Fasteners
Once your ribbon is ready, you'll need three basic items to secure the finished bow:
- Sharp scissors — dull blades crush the wire edge and fray the ribbon
- Floral wire, pipe cleaner, or zip tie (10–12 inch length) — to cinch and hold the bow's center
- Wire cutters (optional) — for trimming excess fastener after securing
Fastener comparison:
| Fastener | Best For | Key Advantage |
|---|---|---|
| 22-gauge floral wire | Standard bows, delicate work | Industry standard; thin and flexible but holds securely |
| Zip ties | Heavy outdoor wreaths, grapevine bases | Ultimate security; prevents center from slipping |
| Pipe cleaners | Beginner practice, casual crafts | Soft on hands; grips ribbon fabric well |
How to Make a Bow with Wired Ribbon: Step-by-Step
This loop-and-pinch method works for beginners and produces a full, multi-loop bow suitable for wreaths, gifts, tree toppers, and more. The key is keeping one hand pinching the center throughout the entire process.
Step 1: Make the Center Loop
Hold the end of the ribbon, leaving a 6–8 inch tail, and form a small loop approximately 2–3 inches in diameter. Pinch it at the center between your thumb and forefinger.
This small center loop is the anchor point for every loop that follows. Keep it pinched throughout the entire process. Two technique rules apply from here on:
- The "right side" (printed or shiny face) should always face outward
- Twist the ribbon at the center before each new loop to maintain that orientation
Step 2: Build the First Pair of Side Loops
Bring the ribbon up and away from the center pinch point to form the first larger loop on the right side, keeping it 4–6 inches for a standard bow. Bring the ribbon back to the center pinch point, twist it once so the right side faces out, then form a matching loop of the same size on the left side.
Consistent loop size on both sides is what creates a symmetrical, balanced bow. The most common beginner error is allowing loops to vary in length at this stage.
Step 3: Continue Building Loops
Repeat Step 2, alternating right and left, until you have 3 loops on each side (6 loops total) for a standard bow. For a fuller, more dramatic bow (ideal for large wreaths or tree toppers), continue until you have 4–5 loops per side.
Remember to:
- Keep all loops tightly pinched at the center
- Twist the ribbon between each loop to maintain the right-side-out orientation
- Maintain consistent loop sizes for a balanced appearance
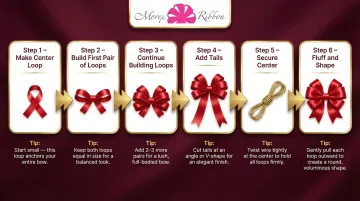
Step 4: Add the Tails
After completing the final loop, bring the ribbon down and leave a tail that mirrors the length of the first tail (typically 6–8 inches), then cut the ribbon from the spool.
Both tails hang below the finished bow and can later be trimmed at a 45-degree angle or V-notch for a clean, professional finish. For dramatic installations like stair railings or swags, leave tails 12–18 inches long.
Step 5: Secure the Center
Thread a piece of floral wire or pipe cleaner through the small center loop made in Step 1, wrapping it around all the pinched layers and twisting tightly at the back.
The bow's shape depends entirely on how securely this center is cinched. Professional florists recommend twisting the bow itself rather than just the wire to achieve maximum tension. The wire should feel firm and the loops locked in place before moving on.
If attaching to a wreath, leave the wire ends long enough to thread through the wreath form.
Step 6: Fluff and Shape
Once secured, begin separating and pulling each individual loop outward and upward, rotating them in different directions to create a full, rounded, dimensional shape.
The wire woven into the ribbon's edges holds each loop in whatever position you bend it into — that structural memory is what separates wired ribbon from standard ribbon for bow making. A well-fluffed bow looks twice as full as an unfluffed one, so gently work each loop until you achieve the desired fullness and shape.
Key Factors That Affect How Your Bow Turns Out
Two bows made with the same technique can look very different based on a few controllable variables. Understanding these helps you consistently produce results you're happy with.
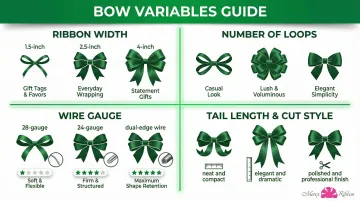
Ribbon Width
Wider ribbon produces different visual effects than narrower ribbon, though the construction method remains the same:
- 2.5 inches and above — Large, bold bows suited to wreaths and tree toppers
- 1 to 1.5 inches — Delicate bows for gifts, hair accessories, and smaller decorations
The ribbon width naturally scales the loop size, so a bow made with 4-inch ribbon will have noticeably larger loops than one made with 1.5-inch ribbon, even if you create the same number of loops.
Number of Loops
The number of loops per side directly controls the bow's fullness and visual weight:
- 3 loops per side — Minimum for a presentable bow; appropriate for simple gift wrapping
- 4–5 loops per side — Creates the lush, florist-style look seen on professional wreaths and gift baskets
- 2 loops per side — Best reserved for long-tailed variations where flowing ribbon is the focus
Beginners should start with three loops per side and increase as they get comfortable with the technique.
Ribbon Stiffness and Wire Quality
The wire gauge embedded in ribbon edges determines how well loops hold their shape through handling, humidity, and display. Low-quality wire breaks or bends back on itself — loops that looked great on day one start drooping within weeks.
Wire gauge considerations:
- Thin wire (28 gauge) — Flexible enough for tight loops, but may not support large bows long-term
- Thick wire (24 gauge) — Maintains rigid structure on full-scale wreaths and statement bows
- Dual-edge wiring — Required for symmetrical control; single-edge wiring causes one side to collapse
Before buying, flex a small section of ribbon edge. Quality wire bends without kinking and springs back slightly — a quick test that tells you a lot.
Tail Length and Cut Style
Tail length changes the bow's overall look more than most beginners expect:
- Short tails (3–4 inches) — Tidy, compact finish for gift bows
- Long tails (8–12 inches) — Flowing, elegant effect for wreaths and mantel décor
Tail cut options:
- Straight cut — Simple and clean
- Diagonal cut — Classic angled finish
- V-notch (chevron/dovetail) — Most polished, professional appearance
How to cut a V-notch: Fold the ribbon tail lengthwise, then cut diagonally from the folded edge toward the outer wired edge. This creates a clean swallowtail finish that minimizes fraying.
Common Mistakes to Avoid When Making Wired Ribbon Bows
- Releasing the center pinch too early — Letting go while forming new loops causes the entire structure to collapse, requiring you to start over. Keep constant thumb-and-forefinger pressure on that center point until the wire is secured.
- Skipping the twist between loops — Without a twist, the ribbon's dull back side faces outward on alternating loops, creating a mismatched appearance. Every loop requires a twist at the center.
- Securing the wire too loosely — A wire twisted with insufficient tension lets loops shift and spread unevenly during fluffing, producing a lopsided bow. Twist until it feels firm and the loops are genuinely locked before moving on.
Bow Styles and Variations You Can Try
Once you master the basic loop-and-pinch method, the same technique adapts to several distinct bow styles by changing a few simple variables.
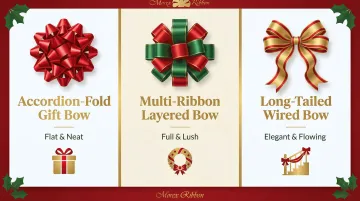
Accordion-Fold Gift Bow
The accordion (or pleated) method offers an alternative for gift wrapping. Fold a long piece of ribbon back and forth in equal-length segments, pinch the center, and secure with wire or ribbon.
The result is a flat, pom-pom style bow rather than a rounded looped bow — faster to make and better suited to flat packages than dimensional décor.
Multi-Ribbon Layered Bow
Hold two ribbons of the same width together and treat them as one ribbon throughout the loop method. This produces a layered, two-toned bow.
Pairing a solid-color wired ribbon with a patterned one works particularly well here. The contrast between textures gives Christmas tree toppers and holiday wreaths a fuller, more layered look than a single ribbon can achieve.
Long-Tailed Wired Bow
Use the same loop method but leave significantly longer tails (12–18 inches) and make fewer loops (2 per side).
Long tails suit applications where movement matters more than a full rounded shape. Common placements include:
- Stair railings and banisters
- Swags and mantel garlands
- Lantern and outdoor décor
- Woven through greenery for a cascading finish
Frequently Asked Questions
Can you make a bow out of wired ribbon?
Yes, wired ribbon is actually the easiest type to make bows with. The wire in both edges holds each loop in place as you build the bow and keeps the shape after it's finished, making it easier to work with than unwired ribbon.
How much wired ribbon do I need to make a bow?
A standard bow with 3 loops per side and short tails requires approximately 6 feet of ribbon. A larger wreath bow with 4–5 loops and longer tails may need 8–10 feet. Start with more ribbon than you think you need and trim the tails at the end.
What width ribbon is best for making bows?
2.5-inch ribbon is the most popular width for wreath and decorative bows, while 1.5-inch works well for gift bows. Narrower widths like 7/8-inch are suited for smaller crafts and hair accessories. Loop size scales with ribbon width, so choose based on your finished bow's intended size.
How do you keep a wired ribbon bow from falling apart?
The key is securing the center tightly with floral wire or a pipe cleaner twisted firmly through the center and knotted at the back. A loose center tie is the most common reason bows lose their shape over time.
What is the difference between wired and unwired ribbon for making bows?
Wired ribbon has a thin metal wire running along both edges that holds each loop in position as you work and after the bow is complete. Unwired ribbon requires more precise hand tension throughout and tends to droop after being shaped.
Can you reuse or reshape a wired ribbon bow?
Yes — wired ribbon bows can be reshaped multiple times. Simply bend the loops back into position and re-fluff as needed, which makes them a practical choice for seasonal decorations stored and reused each year.