Introduction
Many gift givers struggle with presentation that feels personal rather than generic. Research from the Journal of Consumer Psychology confirms that wrapping directly influences how recipients perceive your gift — and when the giver is a friend, a handmade touch like a fluffy tulle bow actually creates positive expectation disconfirmation, making the gift feel more thoughtful than overly neat wrapping.
Making a tulle bow sounds simple, but the final look varies dramatically based on tulle width, number of strips, cutting technique, and how thoroughly you fluff the layers. Beginners often overlook these variables — and end up with flat or lopsided results.
This guide walks you through materials, step-by-step instructions, the variables that affect appearance, common mistakes, and creative variations so you can make a bow that actually looks intentional.
Key Takeaways
- Requires only tulle, scissors, and 10–15 minutes to complete
- Stack 6–8 tulle strips, secure around the gift, snip the loops, and fluff for full volume
- 6-inch tulle width works best for standard gift boxes
- Skipping the fluffing step is the #1 reason bows look flat
What You Need to Make a Tulle Bow for Gifts
Preparation is straightforward, but material choices directly impact fullness, color vibrancy, and overall polish. Not all tulle performs the same.
Materials
You'll need:
- Tulle ribbon (rolled or pre-cut strips)
- Sharp scissors
- Optional: Twist tie, thin wire, or rubber band to secure the center
No glue gun required for the basic tied method. The tulle's natural friction holds the bow together.
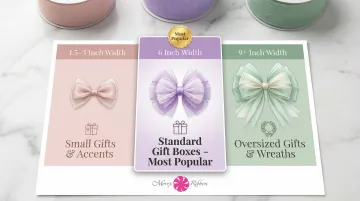
Width determines how full your bow looks. For gift bows:
- 6-inch wide tulle is most common for full, lush bows on standard gift boxes
- 1.5–3 inch widths suit smaller packages or accent bows
- 9-inch widths work for oversized gifts or dramatic wreaths
Morex Ribbon offers tulle in multiple widths and colorfast colors, making it easy to match any occasion or gift theme so colors stay vibrant against any wrapping paper.
Material quality affects both color and structure. Polyester tulle uses disperse dyes that are highly colorfast, while nylon tulle uses acid dyes prone to "crocking" (color transfer through rubbing or moisture). Polyester is also stiffer, helping bows hold their shape better than nylon.
Preparing Your Tulle Strips
Strip length formula:
- Wrap-around method: Package circumference + 12–18 inches for tying
- Separate bow method: 12–18 inches per strip (no wrapping needed)
For a standard 8×10 inch box, cut strips to approximately 20–24 inches. For smaller jewelry boxes, 12–15 inches works well.
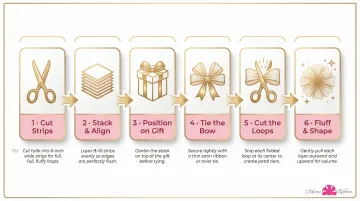
How to Make a Tulle Bow for Gifts: Step-by-Step
Step 1: Cut Your Tulle Strips
Cut 6–8 strips of tulle to equal length. Consistency is critical — uneven strips create a lopsided bow that's nearly impossible to fix after tying.
Pro tip: Stack all strips and cut them together in one pass for perfect uniformity.
Step 2: Stack and Align the Strips
Layer all strips directly on top of each other and smooth flat. Aligning edges now makes centering on the gift much easier and produces a more uniform bow.
Step 3: Position the Strips on the Gift
Two approaches:
- Wrap-around method: Place the gift directly in the center of the stacked strips
- Tie-on method: Gather strips at the center point without wrapping around the package
Choose based on gift size and packaging. The wrap-around method works best for boxes; the tie-on method suits gift bags or oddly shaped items.
Step 4: Tie the Bow
Bring all strips up around the gift and tie a basic knot followed by a bow loop — just like tying a shoelace, but holding all strips together as one.
Keep all strips taut during tying to prevent slipping — a loose center knot causes the bow to shift or fall apart when handled.
Step 5: Cut the Loops
After tying, cut the large loops of the bow so all ends are roughly the same length as the loose tails. This creates the multi-layered "pom-pom" style look rather than a traditional two-loop bow.
Step 6: Fluff and Shape
Separate each individual layer of tulle by gently pulling loops apart one at a time. This step transforms a flat tied strip into a full, dimensional bow.
Take your time here — spend at least 2–3 minutes adjusting until the shape feels balanced and voluminous. This step has the biggest visual impact.
For best results, keep these shaping tips in mind:
- Pull each loop from a different angle to build even volume
- Work from the outer layers inward to avoid disturbing the center knot
- Lightly pinch and release each layer rather than tugging hard, which can tear tulle
Key Variables That Affect Your Tulle Bow's Look
Two people can follow the same steps and end up with noticeably different results. These four variables explain why.
Tulle Width
| Width | Best For | Visual Effect |
|---|---|---|
| 1.5–3 inches | Small gifts, jewelry boxes, cards, hair clips | Delicate and compact |
| 6 inches | Standard apparel boxes, gift baskets, medium wreaths | Classic fluffy pom-pom (industry standard) |
| 9+ inches | Oversized gifts, large wreaths, wedding arches | Dramatic and highly voluminous |
Match tulle width to package size for proportional results. Don't attempt a large gift bow with 1.5-inch tulle, or the bow will look skimpy.
Number of Strips
- 7–8 strips: Dense, luxurious bow
- 4–5 strips: Lighter, airier look
Using too few strips is one of the most common reasons a tulle bow looks skimpy rather than full. Craft educators recommend 4–6 strips minimum for a full, finished look.
Strip Length
For most standard gift bows, strips between 12–18 inches work well. Longer strips give more material when fluffing loops, increasing fullness. Strips shorter than 10 inches leave little room to cut loops evenly, making the bow appear flat or tight.
Tulle Color and Texture
- Single-color bows: Clean, elegant look
- Layered colors: Depth and visual interest (e.g., white and gold, red and silver)
Colorfast tulle ribbon — such as Morex Ribbon's tulle styles — keeps colors vibrant without bleeding onto wrapping paper, which matters most with white or light-colored gift wrap.
Common Mistakes When Making a Tulle Bow
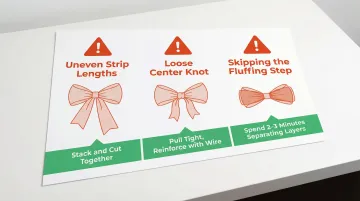
Most tulle bow problems come down to three mistakes — all easy to avoid once you know what to watch for.
Uneven strip lengths. Strips cut to different lengths are nearly impossible to fix after tying. Stack all strips and cut them together in a single pass with sharp scissors before you start.
A loose center knot. A slack knot causes the bow to shift, slide off the gift, or fall apart when handled. Pull the first knot tight before forming the loops. If the tulle keeps slipping, use a twist tie or thin wire to reinforce the center.
Skipping the fluffing step. Many beginners tie the bow and call it done, leaving a flat, underwhelming result. Plan to spend at least 2–3 minutes separating layers individually and reshaping each loop. This one step has the biggest impact on the finished look.
Tulle Bow Variations to Try
The Looped (No-Tie) Bow
Instead of tying the tulle, fold multiple strips into loops and secure them at the center with wire or a rubber band, then fan the loops out in a circle.
This method works well for very large, decorative bows on oversized gifts or gift bags. Leaving loops closed makes the bow sturdier with a soft curve and gentle pleats — no wrapping required.
The Multi-Color Layered Bow
Use 3–4 strips of two different tulle colors, alternating layers before tying. This technique creates depth and works especially well for:
- Holiday themes (red and green, white and gold)
- Baby showers (pink and white, mint and cream)
- Seasonal gifts (orange and brown for autumn)
Tulle Bow on a Hair Clip or Wreath
Gift bows aren't the only application. The same looping and tying technique transfers easily to accessories and decor:
- Hair clips: Attach to a barrette with a glue gun
- Wreaths: Weave into wire wreath frames as accent bows
- Garlands: Tie multiple bows along a string for festive party decor
Once you've made a few gift bows, these variations take minutes to adapt.
Frequently Asked Questions
What kind of tulle works best for making gift bows?
Soft, lightweight tulle ribbon on a roll (as opposed to stiff netting) is ideal for gift bows. 6-inch wide tulle is the most versatile width for standard gift boxes. Colorfast polyester tulle holds its vibrancy better over time and won't bleed onto wrapping paper.
How much tulle do I need to make one bow?
For a standard tied gift bow, 6–8 strips each measuring the package circumference plus 12–18 inches is a good starting point. A single 25-yard spool typically yields 8–12 full bows, making it a cost-effective option for wrapping multiple gifts.
Can I make a tulle bow without cutting the tulle?
Yes, the looped (no-tie) method allows you to create a bow by folding the tulle into loops and securing the center with wire, avoiding any cutting. However, cutting loops after tying typically produces a fuller, more symmetrical result.
How do I keep a tulle bow fluffy and full?
Fluffing individual layers right after tying is key. Use at least 6 strips and choose a wider tulle width to prevent the bow from looking flat. Reshaping by hand before presenting the gift also helps maintain volume.
Can tulle bows be reused?
Tulle bows can often be carefully untied and re-fluffed for reuse, especially if secured gently. Colorfast and washable polyester tulle holds up better through multiple uses than nylon alternatives.
Do tulle bows work on all gift sizes?
Tulle bows can be scaled to any gift size by adjusting tulle width, strip length, and number of strips. Narrower tulle suits small boxes or bags, while wider tulle is better for large boxes or gift baskets.